----- Begin Update Block @ 8th Jun 2008 -----
將以下"/home/user/"開頭的路徑一律改為"~/"開頭,config檔中的路徑除外。
----- End Update Block @ 8th Jun 2008 -----
寫技術文件並非多高深的學問,只需要記住幾個要點就可以寫出易懂的文件。
*永遠假設讀者什麼都不懂(eg. not only rookies but DUMMIES!)
*完整地敘述scenario(eg. what is our goal, where are we, what are the problems, what needs to be done)
*提供可複製的做法,讓dummies看了之後即便不加思索地照做也能得到正確的結果(just like report bugs)
我相信很多人都聽過以上的論點,尤其是寫過論文的人[1],老闆在review paper的時候還會不停地耳提面命。
然而在opensource界的人大都不太喜歡寫document,"Read the code, everything is in it!" they said。
因此造成一般人,同時也是大部分的人,在嘗試安裝/設定某些opensource package的時候時常覺得不知所措,例如Linux Cross Reference (LXR)採 用的LXRng系統[2],雖然有善心人士提供安裝文件[3],但是仍舊不夠直覺,我們在安裝的時候仍然需要花點時間摸索與猜測。接下來的版面將融合 [3]中的兩篇安裝文件(順便中文化),讓想要在本機端建立code cross reference的人可以無痛安裝LXRng。
讓我開始練習本文開頭所提到的幾個要點!
*永遠假設讀者什麼都不懂
-- 什麼是LXRng
LXRng原本是一套用來替Linux原始碼產生網頁介面cross reference(之後簡稱XR)的套件[4],稍加修改設定之後便可替任何軟體專案產生XR以便trace/browse code,如頁面[2]除了Linux以外也列出如Mac OS X與Perl等專案的XR。LXRng可以直接使用version control的repository(方法一)[5]也可以利用已經存在於本機硬碟上任一存放source code的目錄(方法二)產生XR[6]。
*完整地敘述scenario
-- what is our goal
常常在登入LXR官方網頁時發現該站正在維護中因而無法使用該網站trace code,而維護時間有時長達兩天,因此想要在Linux環境中安裝LXRng替Linux原始碼產生XR方便隨時查詢原始碼[7]。
-- where are we
本文件中的指令與套件名稱以Ubuntu 8.04 (Hardy)提供的為基準,範例使用的登入帳號為user。
----- Begin Update Block @ 6th Jun 2008 -----
搭配至少512MB的記憶體,有人(moiamond at gmail dot com)反應使用256MB記憶體會無法成功製作XR,程式會在進度到達100%之前就結束並沒有顯示任何錯誤訊息。
----- End Update Block @ 6th Jun 2008 -----
-- what are the problems
該安裝哪些額外的套件?該如何設定?
-- what needs to be done
1) LXRng使由許多package[8]建構而成,因1此想當然爾我們必須安裝相關套件,安裝指令為:
$ sudo aptitude install git-core postgresql-8.3 postgresql-client-8.3 libxapian15 libsearch-xapian-perl apache2 libapache2-mod-perl2 libcgi-simple-perl libcgi-ajax-perl libhtml-parser-perl libtemplate-perl libterm-progressbar-perl libdevel-size-perl libdbd-pg-perl ctags
2) 替資料庫新增擁有最大權限的使用者帳號[9],指令為:
$ sudo -i
$ su - postgres
$ createuser user # Answer "yes" when asked about superprivileged access
$ exit
$ exit
3) 替即將要產生的XR建立資料庫,並將http服務使用者[10]設定為該資料庫的一般使用者,因此在建立www-data帳號遇到任何問題都回答"N",指令為:
$ createdb lxrng
$ createuser www-data
4) 由LXR的repository取得LXRng,指令為:
$ cd ~
$ git-clone git://lxr.linux.no/git/lxrng.git
5) 開啟LXRng設定檔,指令為:
$ cd ~/lxrng
$ cp lxrng.conf-dist lxrng.conf
$ vim lxrng.conf
6) 將以下的行數加以註解
use LXRng::Repo::Git;
my $gitrepo = LXRng::Repo::Git
->new('/var/lib/lxrng/repos/linux-2.6/.git',
release_re => qr/^v[^-]*$/,
author_timestamp => 0);
my $search = LXRng::Search::Xapian->new('/var/lib/lxrng/text-db/linux-2.6');
7) 加入以下指令:
use LXRng::Repo::Plain;
my $plainrepo = LXRng::Repo::Plain->new('/home/user/src/linux-source'); [11]
my $search = LXRng::Search::Xapian->new('/home/user/src/linux-source-2.6.24-textdb'); [12]
8) 修改下列行數:
'repository' => $gitrepo, --改為--> 'repository' => $plainrepo,
'base_url' => 'http://lxr-test.linpro.no/lxr', --改為--> 'base_url' => 'http://localhost/lxr', [13]
'cache' => '/var/lib/lxrng/cache', --改為--> 'cache' => '/home/user/lxrng/cache', [14]
'ver_list' => [$gitrepo->allversions], --改為--> 'ver_list' => ['v2.6.24'],
'ver_default' => 'v2.6.20.3', --改為--> 'ver_default' => 'v2.6.24',
9) 存檔後離開編輯器(vim in this example)
10) 取得Linux source code並將目錄結構設定成與步驟7, 8中的設定相符合,指令為:
$ sudo aptitude install linux-source-2.6.24
$ mkdir ~/src
$ cp /usr/src/linux-source-2.6.24.tar.bz2 ~/src
$ cd ~/src
$ tar xjf linux-source-2.6.24.tar.bz2
$ mkdir linux-source
$ mkdir linux-source/v2.6.24
$ mv linux-source-2.6.24/* linux-source/v2.6.24
$ mkdir linux-source-2.6.24-textdb
$ mkdir ~/lxrng/cache
$ chmod 777 ~/lxrng/cache -R
$ chmod 777 ~/lxrng/webroot -R
$ make -C ~/lxrng/webroot/.static/gfx
11) 產生Linux-2.6.24的XR[15],指令為:
$ cd ~/lxrng
$ ./lxr-db-admin linux --init [16]
$ ./lxr-genxref linux
12) 設置Apache2
$ cp apache2-site.conf-dist-mod_perl apache2-site.conf
$ sudo ln -s ~/lxrng/apache2-site.conf /etc/apache2/sites-enabled/010-lxrng
$ vim apache2-site.conf
將所有@@LXRROOT@@替換成/home/user/lxrng
將@@LXRURL@@替換成lxr
13) 重新啟動Apache2
$ sudo /etc/init.d/apache2 reload
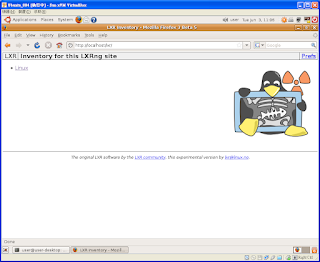
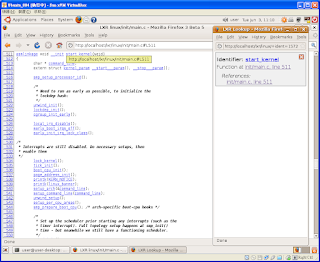
14) 使用瀏覽器開啟http://localhost/lxr即可開始查詢原始碼,如以下screenshots:
----- Begin Update Block @ 10th Jun 2008 -----
如果要更換domain name,如將現有的"localhost"改為"somewhere.com",只需要將"lxrng.conf"中的"base_url"替換之後再執行./lxr-genxref linux即可,這次的執行時間十分短,因為XR都已經存在,現在就可以使用瀏覽器開啟新的網址"http://somewhere.com/lxr"瀏覽原始碼。
----- End Update Block @ 10th Jun 2008 -----
PS. 目前仍無法產生pdf檔案,待研究
[1] 寫論文要遵守的規則當然不只如此
[2] http://lxr.linux.no/git
[3] Thanks to Ahmed: http://darwish-07.blogspot.com/2008/02/howto-lxrng-on-ubuntu-710.html
Thanks to Fred: http://lxr.linux.no/.static/contrib/lxr-notes-ubuntu.txt
[4] http://lxr.linux.no/git/linux
[5] 目前似乎僅支援GIT,文件中並沒有提及其他的protocol
[6] 我目前僅成功使用本機專案產生XR,直接使用GIT's repository則會得到"Nothing to do"的訊息
[7] 本篇僅說明如何使用方法二產生XR
[8] Perl, CPAN, PostgreSQL, Xapian and Excuberant Ctags
[9] 與目前Linux登入帳戶相同,因此在此範例為user
[10] Ubuntu的預設值為www-data
[11] 存放原始碼的目錄
[12] 存放XR的目錄
[13] XR的URL
[14] XR運作時存放cache的目錄
[15] 在我的VM中跑了將近五個小時
[16] 指令中含有linux是因為lxrng.conf中的標籤設置為linux,設定碼為:'linux' => {
Search Google
Tuesday, June 03, 2008
Technical Writing's Rule Of Thumb + Local Web based Code Cross Reference (eg. LXR clone)
Subscribe to:
Post Comments (Atom)


5 comments:
t@c0您好,我对lxr和数据库操作都不大熟悉,我新增新的代码项目后lxrng.conf配置文件如下:
# Configuration file
#
#
use LXRng::Index::PgBatch;
#MT#use LXRng::Repo::Git;
use LXRng::Search::Xapian;
#MT#my $gitrepo = LXRng::Repo::Git
#MT# ->new('/var/lib/lxrng/repos/linux-2.6/.git',
#MT# release_re => qr/^v[^-]*$/,
#MT# author_timestamp => 0);
use LXRng::Repo::Plain;
my $plainrepo = LXRng::Repo::Plain->new('/home/microtiger/src/linux-source');
my $search = LXRng::Search::Xapian->new('/home/microtiger/src/linux-source-2.6.26-textdb');
my $plainrepo = LXRng::Repo::Plain->new('/home/microtiger/src/linux-dm644x');
my $search = LXRng::Search::Xapian->new('/home/microtiger/src/linux-source-2.6.10-textdb');
my $index = LXRng::Index::PgBatch->new(db_spec => 'dbname=lxrng;port=5432',
db_user => "", db_pass => "",
# table_prefix => 'lxr'
);
#MT#my $search = LXRng::Search::Xapian->new('/var/lib/lxrng/text-db/linux-2.6');
return {
'linux' => {
'repository' => $plainrepo,
'index' => $index,
'search' => $search,
'base_url' => 'http://localhost/lxr',
# Must be writable by httpd user:
'cache' => '/home/microtiger/lxrng/cache',
'fs_charset' => 'iso-8859-1',
'content_charset' => 'iso-8859-1',
'languages' => ['C'],
'ver_list' => ['v2.6.26'],
'ver_list' => ['v2.6.10'],
'ver_default' => 'v2.6.10',
'include_maps' =>
[
[qr|^arch/(.*?)/|, qr|^asm/(.*)|,
sub { "include/asm-$_[0]/$_[1]" }],
[qr|^include/asm-(.*?)/|, qr|^asm/(.*)|,
sub { "include/asm-$_[0]/$_[1]" }],
[qr|^|, qr|^asm/(.*)|,
sub { map { "include/asm-$_/$_[0]" }
qw(i386 alpha arm ia64 m68k mips mips64),
qw(ppc s390 sh sparc sparc64 x86_64) }],
[qr|^|, qr|(.*)|,
sub { "include/$_[0]" }],
],
},
};
上述文件中
my $plainrepo = LXRng::Repo::Plain->new('/home/microtiger/src/linux-dm644x');
my $search = LXRng::Search::Xapian->new('/home/microtiger/src/linux-source-2.6.10-textdb');
'ver_list' => ['v2.6.10'],
'ver_default' => 'v2.6.10',
都是新增加的项目,但是在操作11)步骤的时候发生错误:
microtiger@microtiger-tiger:~/lxrng$ ./lxr-db-admin linux --init
"my" variable $plainrepo masks earlier declaration in same scope at configuration file line 20, <$cfgfile> line 66.
"my" variable $search masks earlier declaration in same scope at configuration file line 21, <$cfgfile> line 66.
DBD::Pg::db do failed: ERROR: relation "treenum" already exists
DBD::Pg::db do failed: ERROR: relation "treenum" already exists
看样子是重复定义了,但是我不大清楚如何添加新的项目到lxr里面,新添加的项目要如何操作,修改的具体步骤能给我做个示范不?我是初学者,希望您能够讲解的详细点,打扰之处敬请谅解,谢谢!
主要是我不大清楚在第7)、8)两个步骤怎么添加新的代码路径,抱歉刚刚开始使用lxr,经验不足,多多请教了,谢谢!
t@c0您好,能否留下个联系方式?email或者gtalk帐号都行,谢谢,有不少问题请教您,谢谢!
您得到的錯誤訊息所表示的意義應該是DB已存在。
我忘了註明也需要替新的XR建立新的DB --> 因此(3)也需要更改。
至於聯絡方法,Email請參照blog左上方的contact tag。
A local web-based code cross reference tool could be a valuable resource for technical writers.
Post a Comment